
Choosing a hiking backpack starts with matching torso length, frame support, load capacity, and trail-ready features to the specific way you hike. Too many buyers grab the first bag on the shelf and pay for it later with sore shoulders, wasted volume, and gear that shifts on every step. A proper pack acts as a mobile base camp on your back, so getting it right protects your body, your budget, and your trip.
The most reliable process is simple: measure your torso, define the gear and water you normally carry, select an appropriate capacity, and test the loaded suspension. Features, materials, hydration access, ventilation, and weather protection come after fit and load support.
How Do You Know a Hiking Backpack Will Actually Fit?
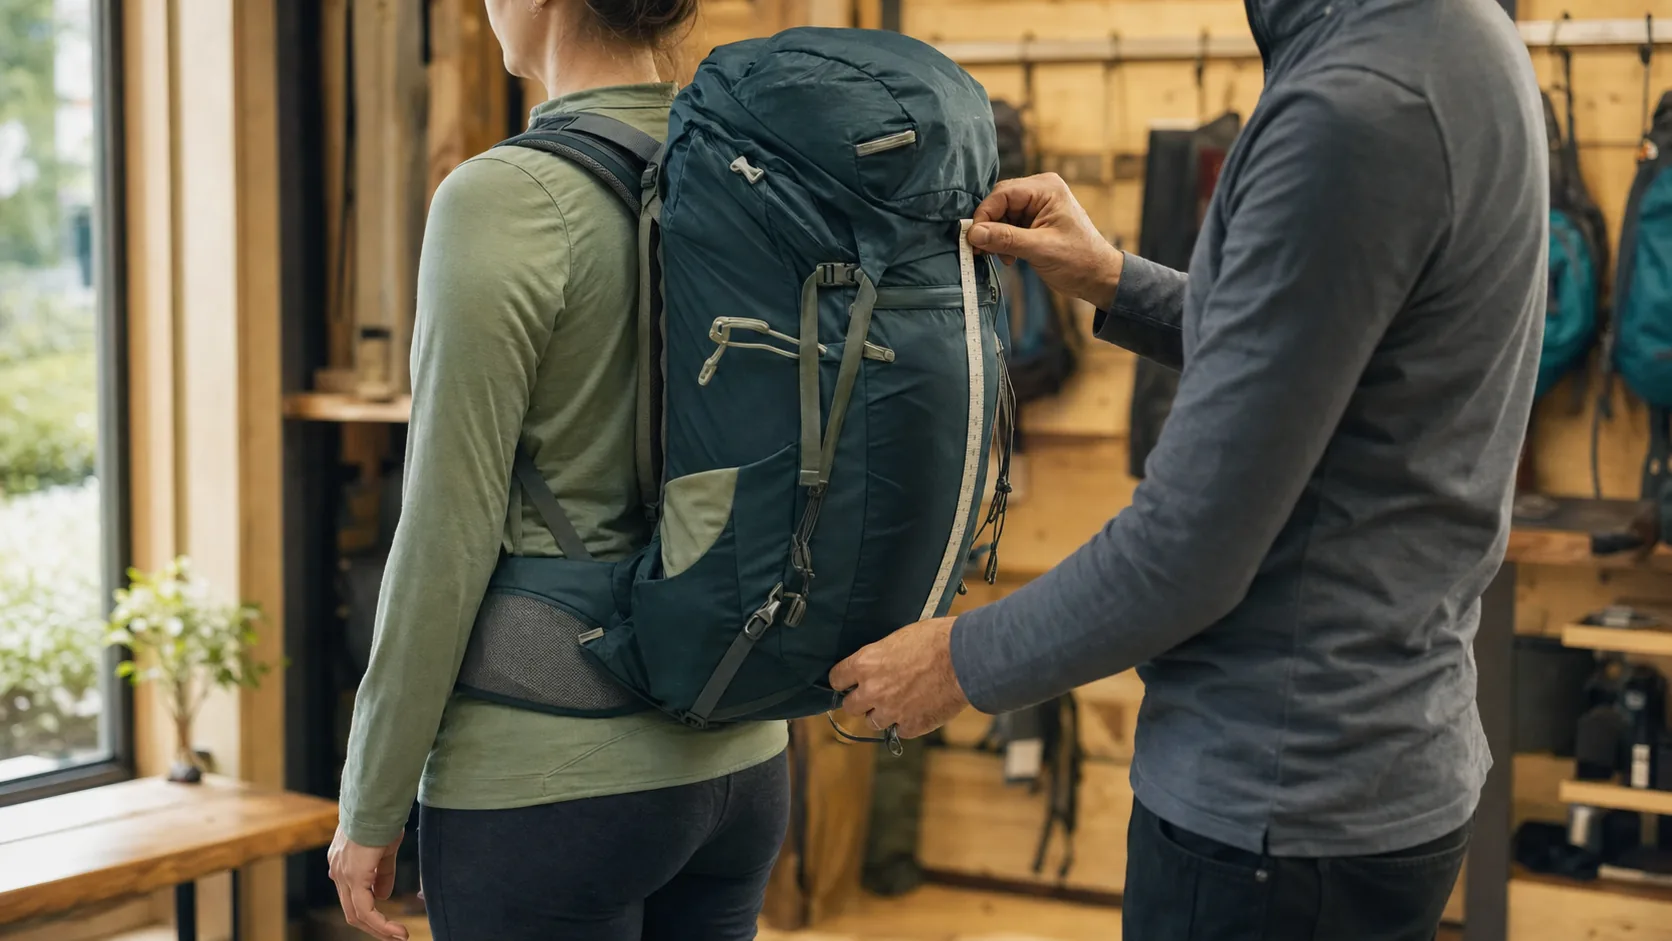
You know a pack fits when torso length, hip belt position, and shoulder strap tension line up with your body measurements, not just the sizing sticker. Learning how to choose a hiking backpack begins with measuring your torso from the C7 vertebra at the base of your neck down to the top of your iliac crest, since that number, not your height, guides frame length.

Two hikers who share a clothing size can still need different packs because their torso lengths, shoulder shapes, and hip circumferences differ. Fit also relies on where the load actually rests. The hip belt should carry a large share of the downward pressure, while the shoulder straps stabilize the upper pack without creating numbness or sharp pressure.
Frame type should follow the loaded weight. Internal frames suit most backpackers because they hold the load close and remain stable on uneven ground. External frames can ventilate well and carry bulky equipment, but they are heavier and less compact. Frameless packs make sense only when the complete load stays light enough for the user's shoulders and packing technique. Choose the frame for the heaviest realistic trip, not for an aspirational ultralight list.
How Do You Measure Torso Length Correctly?
Torso length is measured from your C7 vertebra to the imaginary line running across the top of your hip bones. Ask a friend to hold a soft tape against your spine while you stand upright with your shoulders relaxed, then compare that reading with the size chart for the exact pack model.
Generic sizing bands can help you understand the process, but they are not universal. Some brands may use ranges similar to these:
- Small: approximately 15 to 17.5 inches
- Medium: approximately 18 to 19.5 inches
- Large: approximately 20 inches and above
- Between sizes: test both sizes with weight rather than choosing by height alone
Adjustable harness rails can extend the useful fit range, but the shoulder-strap anchor point and frame shape still need to match your torso.
Men's and women's labels can be useful starting points, but they are not substitutes for measurements. Packs marketed for women often use shorter torso ranges, narrower shoulder spacing, and differently contoured hip belts. Any hiker should test whichever harness shape follows the shoulders and hips most naturally.
Where Should the Hip Belt Rest on Your Body?
The hip belt should wrap around the upper part of the iliac crest, with the padded wings covering the hip bones rather than sagging below them. A belt that rides too high can press into the waist or ribs, while one that rides too low may slide and transfer more pressure to the shoulders.
Check that the padding wraps far enough around the hips and that the tightening webbing has room in both directions. People with narrow waists or pronounced hips may benefit from interchangeable hip-belt sizes.
Can a Backpack Be Adjusted for a Better Fit?
Yes. Many trail packs adjust through a sliding harness, shoulder straps, load lifters, hip-belt webbing, and a sternum strap. Use this sequence:
- Loosen every strap before loading the pack
- Buckle and tighten the hip belt first
- Snug the shoulder straps until they hug without lifting the belt
- Adjust the load lifters until the upper pack feels stable
- Clip and adjust the sternum strap last without restricting breathing
Load-lifter straps often sit at an upward angle when the pack and torso length match, but a fixed 45-degree target is not suitable for every design. Judge the complete fit by stable contact, upright posture, and the absence of pressure points.
| Fit Checkpoint | Correct Position | Common Mistake |
|---|---|---|
| Hip belt | Wraps the upper hip bones | Sits on the abdomen or slides below the hips |
| Shoulder straps | Follow the shoulder without gaps | Dig into the collarbone or carry the whole load |
| Load lifters | Bring the upper pack inward | Overtightened to compensate for the wrong torso size |
| Sternum strap | Stabilizes the shoulder straps | Tight enough to restrict the chest |
What Size Hiking Backpack Do You Really Need?
The right size commonly falls between a compact daypack and a large multi-day pack, but the exact capacity depends on trip length, season, water needs, group equipment, and personal packing style. A summer day hiker and a shoulder-season backpacker need very different volume.

Volume also affects weight and structure. Bigger packs typically add internal frames, load-transfer systems, reinforcement, and heavier fabric, so you carry more pack before adding gear. Match capacity to purpose instead of buying extra space for trips you rarely take.
What Volume Works for Day Hikes?
For day hikes, a 15 to 30 liter pack often covers water, snacks, layers, navigation, and a first-aid kit. Warm-weather routes with reliable water may fit at the lower end. Winter or exposed routes require space for insulation, gloves, traction equipment, and emergency supplies.
A well-designed daypack may use a light frame sheet or minimal structure rather than a full load-hauling frame. The better choice depends on whether you carry only soft layers and water or add camera gear, climbing equipment, or family supplies.
Which Size Fits Overnight and Weekend Trips?
Overnight and two-day trips often fit inside a 30 to 55 liter pack. Consider these general starting points:
- 30 to 40 liters: warm-weather overnighter or compact setup
- 40 to 50 liters: typical weekend or three-season equipment
- 50 liters and above: bulkier insulation, shared gear, or colder conditions
Your shelter and sleep system usually determine whether you can use the lower end of the range. Test-pack the actual equipment instead of assuming all items with the same listed volume will fit the same way.
How Big Should a Multi-Day or Expedition Pack Be?
Multi-day, winter, or remote trips may require 55 to 75 liters or more for insulation, food, shelter, and extra water capacity. Larger packs should include suspension and hip-belt support appropriate to the intended load. Extra volume without structure encourages overpacking and allows the contents to shift.
| Trip Type | Starting Capacity | Main Variable |
|---|---|---|
| Day hike | 15 to 30 L | Weather, water, and safety gear |
| Overnight | 30 to 45 L | Sleep-system and shelter bulk |
| Weekend | 40 to 55 L | Food, layers, and shared equipment |
| Multi-day or winter | 55 to 75+ L | Insulation, food, water, and terrain |
Pick the smallest capacity that holds your real list without forcing the closure. Leave practical room for food, water, or a wet layer rather than filling the bag to its limit in the shop.
Which Features Matter Most When Selecting a Trail Pack?
The features that matter most are compartment layout, external attachment points, and quick-access pockets placed where your hands can reach them. Ignore feature count and focus on how the bag opens, closes, and organizes weight against your spine. Every zipper, loop, and pouch adds weight and another potential failure point, so each one should earn its place.

Well-designed feature sets also anticipate repeated use. Reinforced bar tacks on load-bearing webbing, dependable zippers on frequently opened compartments, and secure compression straps matter more than decorative details.
What Compartments and Pockets Really Help on the Trail?
The most useful compartments are usually a hip-belt pouch, a stretch front pocket, and dual side sleeves that hold bottles or trekking poles. A practical three-zone layout means you rarely need to open the main compartment during the day.
- Top lid pocket: map, headlamp, gloves, and snacks
- Hip-belt pockets: phone, GPS, lip balm, or energy food
- Front stretch pocket: wet shell, damp socks, or tent fly
- Side pockets: bottles or trekking poles
- Bottom compartment: sleeping bag when separate access suits your packing style
Check whether filled side pockets intrude into the main compartment and whether the lid becomes unstable when loaded with dense items.
Are External Attachment Points Worth Paying For?
Exterior loops, ice-axe holders, and daisy chains increase carrying flexibility without requiring a separate compartment. Trekking poles, wet layers, foam pads, helmets, and technical tools may need external mounting, but they should sit close to the pack body and use secure attachment points.
Long equipment should have at least two points of retention. Avoid relying on shock cord alone for heavy objects, and make sure attached gear does not block bottle access or create a snag hazard.
How Do You Judge Zippers, Buckles, and Stitching Quality?
Open every zipper around curves and under light tension. Buckles should release deliberately and tighten without slipping. Inspect load-bearing seams for even stitching, suitable seam allowance, clean bar tacks, and no loose thread ends.
Component names such as YKK, ITW, or Duraflex can help buyers identify a specified supply chain, but logos and stitch count alone do not prove finished-bag quality. Hardware size, material, sewing construction, reinforcement, and load testing must suit the application.
For rugged field-use concepts, tactical backpacks offer relevant examples of reinforced attachment points and compression systems. A hiking pack should adopt only the elements that support its terrain and expected load.
| Feature | High-Value Reason | Skip It When |
|---|---|---|
| Hip-belt pockets | Fast access to small essentials | You use a separate running vest or belt |
| Ice-axe loops | Winter or alpine use | You hike maintained summer trails only |
| Removable lid | Flexible organization | You prefer a simple lightweight closure |
| Bottom compartment | Separate sleep-system access | You use one main packing compartment |
How Should Load Distribution Guide Your Backpack Choice?
Load distribution should follow the principle of the hips supporting much of the downward pressure, the shoulder straps stabilizing the pack, and the frame preserving shape. Load transfer belongs near the top of the selection list because a poorly balanced pack can feel much heavier than the same gear carried close to the body.

Weight placement inside the pack matters as much as the frame outside. Dense items belong close to the spine and centered from left to right, medium-weight items support the core, and soft or light items fill the bottom and perimeter.
What Does a Proper Load-Lifter Angle Look Like?
On many framed packs, load lifters form an upward angle between the shoulder strap and the upper pack. Angles around 30 to 45 degrees are common when the frame extends above the shoulder, but pack geometry varies. A flat or very steep strap does not diagnose fit by itself.
Adjust the lifters until the upper pack comes closer without lifting the shoulder straps or hip belt out of position. If extreme tension is required, recheck torso length, frame height, and internal weight placement.
Why Does the Hip Belt Carry Much of the Weight?
A supportive hip belt transfers pressure around the pelvis and reduces the amount hanging from the shoulders. Many fit guides describe the hips as carrying a majority of the load, but the exact share changes with pack design, body shape, terrain, and movement.
- Hip belt: primary load-transfer component on supported packs
- Shoulder straps: stabilize and control the upper pack
- Sternum strap: positions the shoulder straps rather than bearing weight
- Load lifters: manage the upper pack's relationship to the torso
How Do Sternum Straps Improve Stability?
The sternum strap pulls the shoulder straps inward so they remain positioned during side-hilling, scrambling, or repeated arm movement. It should sit at a comfortable height and remain loose enough for unrestricted breathing.
| Load Component | Main Function | Common Fitting Error |
|---|---|---|
| Hip belt | Transfers and stabilizes the lower load | Loose, low, or wrong belt size |
| Shoulder straps | Controls the upper pack | Overtightened to carry all the weight |
| Sternum strap | Positions shoulder straps | Pulled too tight across the chest |
| Load lifters | Draw the upper pack inward | Used to hide an incorrect torso fit |
A weighted trial is essential. Pack real gear, walk long enough for the foam and webbing to settle, and include stairs, turns, and reaching movements. The load should follow the torso without strong side-to-side sway or an exaggerated forward lean.
What Fabrics and Materials Make a Backpack Trail-Worthy?
Trail-worthy fabrics balance yarn strength, denier, weave, coating, abrasion resistance, tear strength, UV exposure, and weight. From a factory perspective, learning how to choose a hiking backpack fabric means reading beyond the marketing name and understanding the construction behind the label.

Denier alone cannot predict durability. A lower-denier high-tenacity ripstop may outperform a heavier loose-weave fabric in a specific test, while a heavier fabric may still be appropriate for the base or high-wear areas.
What Denier Ratings Should You Look For?
The following ranges describe common design directions rather than universal performance grades:
- 100 to 210D: lightweight or ultralight pack bodies
- 210 to 420D: common three-season balance of weight and durability
- 420 to 630D: rugged, off-trail, or tactical crossover applications
- Higher-denier fabrics: bases, equipment-contact areas, or heavy-duty use
High-tenacity yarns, weave density, ripstop grids, coatings, and reinforcement placement matter alongside the denier number. Ask for finished-fabric specifications and relevant test results when comparing materials for production.
Are Waterproof Materials Really Necessary?
Waterproof or coated fabrics are useful, but a sewn hiking pack may still admit water through seams, zippers, hydration ports, and harness attachment points. Plan the system around fabric coating, seam design, zipper protection, a rain cover, internal liner, and dry bags for critical equipment.
A product should be described as waterproof only when its complete construction and testing support that claim. Otherwise, weather-resistant wording is more accurate.
How Do Recycled Fabrics Compare With Traditional Ones?
Recycled nylon or polyester can match the requirements of a hiking pack when the finished fabric passes the same strength, abrasion, colorfastness, and coating tests specified for the product. Certification claims such as GRS should be supported by current supply-chain documentation.
For brands defining materials, outdoor and tactical bag applications show why fabric, reinforcement, hardware, and field conditions need to be considered as one system.
| Material Direction | Best Use | Main Trade-Off to Verify |
|---|---|---|
| Lightweight ripstop | Day hiking and low base weight | Abrasion and puncture resistance |
| Mid-weight high-tenacity nylon | Three-season packs | Cost and coating performance |
| Heavier polyester or nylon | Rugged and equipment-heavy use | Finished pack weight |
| Certified recycled fabric | Sustainability-led product lines | Documentation and test consistency |
How Do Hydration, Storage, and Back Panel Design Shape Your Pick?
Hydration access, storage geometry, and back-panel design affect trail efficiency and warm-weather comfort. Decide whether you prefer a reservoir, bottles, or a hybrid setup, then check whether the pockets and harness support that choice without reducing stability.
How Do Hydration and Storage Options Shape Your Pick?
Water access influences how often you stop and whether you drink consistently. A bag that holds food and layers but forces you to remove it every time you need water creates unnecessary friction.
What Kind of Hydration System Suits You?
The best system depends on climate, trip length, water sources, and cleaning preferences:
- Reservoir bladder: hose access while moving and weight close to the back panel
- Side bottles: easy inspection, refill, and cleaning
- Hybrid system: reservoir for primary water and a bottle for another drink
- Soft flasks: useful for fast-and-light or running crossover setups
Reservoir users should inspect the hanging point, sleeve capacity, hose ports, routing clips, and separation from electronics. Bottle users should confirm that a full bottle stays secure when bending and can be reached if on-the-move access matters.
How Do Water-Bottle Pockets Affect Convenience?
Pocket angle, stretch, depth, and retention determine whether a bottle is secure and reachable. Test the pack with the bottle size you actually use. A full pocket should not consume excessive main-compartment space or loosen after repeated stretching.
Should You Choose a Bladder-Compatible Pack?
A bladder-compatible pack is helpful for long days or users who prefer frequent hands-free drinking. Look for an internal sleeve, a stable hanging point, hose routing that works from either side when needed, and a sternum or shoulder clip that does not interfere with adjustment.
| Hydration Setup | Useful For | Main Check |
|---|---|---|
| Reservoir | Long climbs and hands-free access | Leak protection and refill access |
| Side bottles | Simple cleaning and visible water level | Reach and pocket retention |
| Hybrid | Flexible drinks or variable routes | Added weight and organization |
| Soft flasks | Fast-and-light use | Capacity and bounce control |
Can Ventilation and Back Panel Design Change Your Comfort?
Back-panel design changes how closely the load sits, how air moves, and how the pack dries. It cannot eliminate sweating, but it can influence comfort in hot or humid conditions.
What Are Trampoline and Channeled Back Panels?
Trampoline panels suspend mesh away from the back to create an air gap. They can improve ventilation but may move the load farther from the spine and create a curved interior. Channeled foam maintains more contact while providing airflow paths. Flat foam offers close load control but often feels warmer.
- Trampoline mesh: maximum air gap, with the load held farther away
- Channeled foam: balance between airflow and close load control
- Flat foam: simple structure and close contact
- Frameless padding: low weight when the carried load remains light and stable
How Does Airflow Affect Long Hikes?
Airflow can help moisture evaporate, but climate, clothing, pace, and pack contact all affect the result. Compare drying speed and material feel rather than relying on one humidity-reduction number.
Do Padded Back Panels Reduce Fatigue?
Padding can distribute pressure and protect against hard contents, but extra softness does not replace a supportive frame or correct fit. Foam density, lumbar shape, ventilation channels, and long-term compression resistance matter more than padding thickness alone.
| Back Panel Style | Main Strength | Main Trade-Off |
|---|---|---|
| Trampoline mesh | Strong ventilation | Load sits farther from the spine |
| Channeled foam | Balanced airflow and control | More back contact than suspended mesh |
| Flat foam | Close load transfer | Warmer against the back |
| Frameless panel | Low pack weight | Requires careful loading and lighter loads |
What Safety and Weather-Ready Features Should You Prioritize?
Safety and weather-ready features matter once a route moves beyond short, predictable conditions. Reflective details, whistle buckles, rain protection, secure tool attachments, and an accessible safety-kit location can add value when they suit the terrain.
Weather resistance is divided among fabric coatings, rain covers, closure design, and internal liners. Combining selected layers protects sleeping gear, electronics, and spare clothing more reliably than relying on one feature.
Are Rain Covers or Waterproof Coatings Better?
Rain covers block direct rain over much of the pack, while coated fabric reduces absorption through the textile. Neither method seals every opening. Water can enter around the back panel, seams, zippers, and hose ports.
- Rain cover: quick external barrier against direct rain
- Coated fabric: reduces absorption through the main textile
- Internal liner or dry bags: protects critical contents
- Roll-top closure: reduces exposure at the main opening when correctly built
Use redundant protection for items that must remain dry, and test whether a supplied cover still fits when exterior pockets are loaded.
How Important Is Reflective or High-Visibility Design?
Reflective piping and high-visibility panels can improve recognition near roads, trail crossings, hunting areas, or low-light environments. Their performance depends on placement, viewing angle, contamination, and the available light source, so they should complement rather than replace a lamp or appropriate visibility equipment.
Do You Need an Emergency Whistle Buckle?
An integrated whistle is convenient and adds little complexity when it is designed into the sternum buckle. Test that the buckle remains easy to operate, that the whistle is accessible, and that the part still meets the strap's primary strength and adjustment requirements.
| Safety Feature | Function | Main Check |
|---|---|---|
| Reflective detail | Low-light recognition | Placement and visibility after wear |
| Whistle buckle | Emergency signaling | Sound and buckle durability |
| Rain cover | External rain barrier | Fit with loaded pockets |
| Internal liner | Dry protection for contents | Closure and puncture resistance |
How Do You Match a Hiking Backpack to Your Trip Type?
Match a backpack to the trip by aligning volume, load support, feature density, and material durability with the terrain and duration. Using a large expedition pack for a light day hike adds unnecessary weight, while forcing multi-day equipment into a small daypack can create poor balance and inadequate access.
Trip type also drives durability requirements. Rocky scrambles, brush, snow tools, and equipment hauling place different demands on fabric and attachment points than maintained dirt trails.
What Backpack Works Best for Day Hiking?
Day hiking packs commonly range from about 18 to 30 liters and prioritize ventilation, water access, and organization for layers and safety gear. A frame may be minimal unless the route requires heavy water, camera equipment, climbing gear, or family supplies.
- 18 to 22 L: compact warm-weather use
- 22 to 28 L: longer days or shoulder-season layers
- 28 L and above: winter clothing, technical gear, or additional group equipment
Which Pack Fits Overnight Camping?
Overnight packs commonly sit between 35 and 50 liters, with a hip belt and internal support appropriate to the carried load. Test-pack the real shelter and sleep system before buying because published capacity does not show how awkward shapes use space.
Is There a Best Backpack for Thru-Hiking?
Long-distance hikers often choose roughly 40 to 60 liters with a simple main compartment, accessible exterior storage for wet gear, low base weight, and a suspension that remains stable at the heaviest resupply load. A frameless or minimal-frame design works only when the complete load and packing method suit it.
| Trip Type | Common Volume Direction | Priority Feature |
|---|---|---|
| Day hike | 18 to 30 L | Water access and ventilation |
| Overnight | 35 to 50 L | Load transfer and sleep-system fit |
| Weekend | 45 to 60 L | Capacity and organization |
| Long-distance | 40 to 60 L | Weight-to-support balance |
| Winter or technical | Varies with equipment | Stability and tool attachments |
Define the hike first and let the pack follow. Do not assume that one volume or suspension style is ideal for every user.
What Common Mistakes Should You Avoid When Buying One?
The most common mistakes are buying by appearance, ignoring torso length, selecting more volume than the gear requires, and copying another person's setup without comparing body shape or trip style. These errors waste money and can turn a well-made pack into an uncomfortable choice.
Why Should You Never Buy Based on Looks Alone?
Color, branding, and photography do not show torso fit, hip-belt grip, shoulder-strap contour, or load transfer. A pack that looks good online may still create collarbone pressure or slide at the hips when loaded. Treat appearance as the final preference after fit and function pass.
Do You Really Need the Most Expensive Bag?
No. The best-fitting model is not always the most expensive. Focus the budget on:
- Correct torso and hip-belt fit
- Suspension appropriate to the real load
- Fabric and reinforcement suited to the terrain
- Reliable hardware and repair policy
- Useful pockets instead of maximum feature count
Price tiers are only rough filters. Entry-level packs may suit occasional day and weekend use, while higher-priced packs may use lighter materials or more adjustable components. Compare cost per trip, warranty and repair support, and loaded comfort rather than assuming price predicts fit.
How Can You Avoid Overpacking or Underpacking?
Write a real gear list, weigh it, and assemble the actual volume before shopping. Include food and water for the intended route rather than adding one fixed percentage to every load. A larger pack is not automatically safer if it encourages unnecessary equipment or lets contents move.
| Mistake | Real Cost | Practical Fix |
|---|---|---|
| Skipping torso measurement | Shoulder or belt discomfort | Measure and compare the exact size chart |
| Buying oversized volume | Extra weight and unstable packing | Test-pack the real equipment |
| Ignoring hip-belt fit | Load remains on the shoulders | Check belt size and weighted grip |
| Chasing a brand or price tier | Overspending without better fit | Compare specifications and loaded comfort |
For brands and retailers, the same mistakes appear as unclear target loads, unverified capacity claims, and feature lists that are not tested in use. Prototype evaluation should include realistic loading, repeated zipper and buckle operation, seam inspection, and carry trials on different body sizes. The outdoor backpack durability case shows how material and reinforcement decisions connect to field performance, while e-commerce bag projects benefit from clear size communication and photography that shows actual capacity.
Choosing the right hiking backpack comes down to fit, volume, features, and an honest match between the pack and the trips you take. Torso measurement, load distribution, fabric specifications, hydration access, ventilation, safety features, and weighted testing all support that decision. Brands developing a market-ready pack line can contact ZWbags to discuss materials, structure, prototypes, and testing requirements.
FAQ
Can I use one hiking backpack for both day hikes and overnight trips?
Yes, within a practical range. A pack around 30 to 35 liters may compress for day use and hold a lightweight overnight setup, but it will be heavier than a dedicated daypack and smaller than many weekend packs. Test it with both complete gear lists before deciding.
What is the best way to test a backpack before buying it?
Load it with real gear or comparable test weight and walk long enough for the foam and webbing to settle. Include stairs, turns, reaching, and a short incline. The test should reveal pressure points, strap slippage, load sway, and whether the hip belt remains in position.
How do I know if my hiking backpack is too heavy?
Body-weight percentages can be rough planning references, but they are not universal safety limits. Pain, numbness, loss of balance, an altered walking posture, or a suspension that collapses under the load are warning signs. Reduce nonessential equipment and seek professional fitting or medical advice when discomfort persists.
What is the best material for a durable hiking backpack?
High-tenacity ripstop nylon in a mid-weight range is common, while heavier nylon or polyester can suit harsh use. The best choice depends on yarn, weave, coating, reinforcement, seam construction, weight target, and finished-fabric testing rather than one denier number.
How do I care for my hiking backpack after each trip?
Empty every pocket, shake out debris, and follow the care label. Spot-clean stains with mild soap and cool water when appropriate, rinse away residue, and air-dry the pack fully away from strong heat or prolonged direct sunlight. Store it dry, with straps loosened and food odors removed.